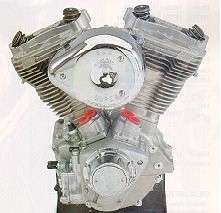
Stage 3 Modifications |
||
| Performance and
Technical information on Stage 3 modifications to a Harley-Davidson 1340 Evolution
motorcycle engine. Build
low cost, maximum performance street engine
You have decided that your current
engine isn't getting the job done. You have made Stage 2 changes to your bike and are still looking for more
power. You are ready for a series Stage 3 engine. These modifications are a little more
complicated than the bolt-on Stage 3 engine. There are many companies out there that are competing for the dollars that Harley-Davidson owners are willing to spend on their bikes. As an owner, you will be bombarded with a vast array of promises, claims and inaccuracies in an effort to separate you from your money. Reading between the lines on many of the performance claims can be bewildering. Does the Harley-Davidson world need another engine modification article? We decided it does, since the results obtained by the engine upgrades listed here provided significantly better results than those documented by the popular magazines aimed at the V-Twin crowd. The Motorcycle Performance Guide staff continues to obtain better results than the "experts" in the press and most performance shops. How to build your own Stage Three engine
This Stage Three engine requires internal changes to the engine. Disassembly of the top end of the engine is required. Some special tools and training is required to perform these upgrades. Unless you are a very good mechanic and have access to a machine shop, it is recommended you find a competent shop to perform these modifications. For those of you that want to assemble the engine yourself, Motorcycle Performance Guide recommends you obtain the proper service manual for your bike. Over the past several years we have installed and tested many manufacturers components. The list of parts used in building this engine is the end result of this testing. The best and least expensive of the components were selected and tested as a single package. The horsepower your bike produces may vary from the results produced here. If you use different parts or do not properly tune your engine, power may change significantly. Motorcycle Performance Guide assures you that the parts list and results are presented as accurately as possible. All the parts used in this engine are readily available through local shops, after-market parts companies and your Harley-Davidson Dealer. The components were installed and tested on a 1994 FXD Dyna Low Rider. Dyno tuning is required to achieve the results listed. All components were installed according to the manufacturer instructions supplied.
The results of the Dyno testing were excellent. The test results showed the engine producing 95.4 horsepower @ 5600 RPM and 95.3 ft. lbs. of torque @ 4600 RPM. While the power curve on this engine was optimized for drag racing and dyno shootouts, it still manages to produce over 80 ft.lbs.. of torque from 3900 to 6000 RPMs. That is some serious power to the rear wheels. This engine is producing 40 horsepower more than a stock bike. Not bad for the relatively low investment in time and money required to get these results. Just how fast is fast enough is a matter of opinion. This 94 FXDL was taken to the drag strip in order to establish what 1/4 mile times could be done. The bike proved to be a very potent H-D drag race bike by turning times in the 11.80 range with 114 MPH speeds. The bike will accelerate to 90+ MPH in 1/8 of a mile. The results are due to a well matched set of parts being installed in the engine. This is an engine combination that many Harley shops do not want you to know about. Who would believe stock Evolution heads could make over 90 horsepower. Just because the heads were not ported and polished, don't think that you can achieve the high horsepower numbers without making some changes to the heads. The Manley performance valves and the 5 angle valve job provide big improvements in air flow through the ports. This is an important part of making good horsepower. Don't forget to have the spring clearance set for .600" lift cams. The SE-57 has a .575" bump on it. The JE 10.5:1 pistons are machined to accept a high lift cam. The performance of the Screamin Eagle SE-57 camshaft was impressive, producing strong torque to match the horsepower potential. Past experience indicated that cams with 252 degrees of duration make excellent street cams. This Harley-Davidson camshaft did not disappoint. The SuperTrapp 2-1 exhaust system with the internal baffles removed was an important component in creating this high horsepower. Installation of the baffles and use of 18 disks results in a 5-7 horsepower drop, but the torque remains the same. The horsepower curve peaks drops to 5700 RPM and the torque peak drops to 3900 RPM. This change in power curve makes the engine very potent on the street. If don't have the money to purchase all the parts listed for this engine, we recommend you make the following changes
The ability to create similar results with other manufacturers parts is a distinct possibility. Motorcycle Performance Guide choose to work with parts that had proven ability to provide increased horsepower and torque. If you use the parts listed in the "Ultimate Street Engine" series of articles, there is little doubt in our minds that your can duplicate our results, provided the engine is in good mechanical shape and properly tuned. Optional parts that have similar specifications to the components used in our engine should provide very similar results. A matched set of engine components, careful assembly and dyno tuning are the keys to building a killer street engine. May your results be a successful as those we have documented. |
||
The Parts List for Stage 3
Maximum Performance
|
||
| The Horsepower Gallery provides an extensive list of bikes , the power they produced and the major engine components. |

